RSS Feed

Can Silicone Bakeware make your life Easier? Review of the Boxiki 3pc. Bakeware set

Those of you who like to make a lot of baked dishes, you might be interested in this. This time we did a review of the silicone and metal 3 piece bakeware set by Boxiki. Silicone has been popular recently as a bakeware material. According to Boxiki their silicone wares can be used up to 500 degrees, and they are also FDA food grade and BPA free. What is a little different about Boxiki’s set is that it is a combination of silicone and metal, with the silicone portion used for the pocket that holds and cooks the actual baked goods, and the metal creating a rim and handles around it. The 3 piece set includes two large baking pans (one rectangular, one round) and one smaller loaf pan.

For the sake of full disclosure, Ask Chef Tony has no financial arrangement with Boxiki. They simply asked us to try their product and post an unbiased review. And that’s what we’re doing today. You can watch our video here, and further down, we’ll give you our breakdown of the pros and cons of this set.

So, after playing around with this bakeware set, here’s what we thought of it.

Overall, I did like this set. The silicone and metal combination makes it easy to work with. The metal handles and rim give it rigidity in the right places to keep the wares from flopping around. As I demonstrated in the video, you can firmly hold a plate against the rim to help you flip the whole piece over. Meanwhile the softness of the silicone shows its advantages with its pliability and its non-stick quality. I find that the baked goods will come out without any prodding, but should you need to, it is easy enough to massage it out of the soft silicone casing. You can also remove items simply by pushing the metal rim down and around your baked goods… really handy I believe when it’s time to serve your dish. I will probably try it out for my cold dishes as well, such as tiramisu. ( link to video recipe here tiramisu video ) .

Of course, there is probably no such thing yet as a perfect bakeware set. All things will have their pros and cons. And while I did like the set overall, I had a small problem when I tried meatloaf in the small loaf pan. It’s unavoidable, but because silicone dissipates heat differently than metal, the meatloaf does not form a hard solid crust around the edges and so it came out a bit on the softer and mushier side than what I would normally get using an all metal pan. The other issue was the handles. They are nice and wide which is very helpful in just giving you a very firm and secure grip, but they do make it too wide to use in any of those small toaster ovens, which I myself like to use from time to time. But in any oven larger than that, you should be fine.

So my short answer is, if you do a lot of baking, you might consider getting yourself a set like this. I wouldn’t toss out your old apparatus, but this makes a nice addition for the right situations.

Boxiki Silicone/Metal 3pc. Bakeware set.

Pros

  • attractive, high quality build
  • easy to handle, soft in the right places, rigid in the right places
  • non-stick… very very easy to remove the finished baked goods
  • good variety of shapes to use
  • easy to wash, clean, and store

Cons

  • too large for small toaster ovens
  • not as good for items that need a hard outer crust, such as meatloaf – stick with metal pans for things like that


Thanks for reading and watching. Let us know if you like our reviews and whether there are any products you’d like us to check out and give an opinion on. Check back on this post later as I plan to post the cake recipe that I used in the video demo ( improvised and came out superb!) Until next time. Ciao!

Chef Tony


Chef Tony as Guest on BronxFoodBlog – Guide to Buying Fresh Fish


Hey Food Fans,

Today, someone did the legwork and logged the miles for us, as bronxfoodblog did a really nice piece about Tony, picking his thoughts over a topic dear to his heart… and stomach – how to choose the freshest fish possible. Check out their great and informative blog post. Tony’s Fish Buying Tips

The food scene is exploding all over NYC and the Bronx is no exception. Check out bronxfoodblog and leave comments on the great work they are doing. And if you happen to be on Arthur Avenue in the Bronx, stop by Randazzo’s Seafood and tell them Chef Tony sent you!

Ciao!


Under Pressure

So, if you’ve been watching my YouTube channel, you probably saw that I recently added a new tool to the kitchen – a pressure cooker. It was given to us by Tristar products and we agreed to try it out and do a review. I never really used a pressure cooker before but I was curious to see what we could come up with. I don’t remember exactly where the idea came up to try to tenderize an octopus came from (I think a viewer may have suggested it some time ago), but it made sense to try it, so indeed I did- with some impressive results. The added pressure really does seem to help tenderize the octopus flesh, and by keeping the liquid trapped inside, very little moisture escapes from the actual octopus, keeping it nice and plump. I can’t complain about the results at all… very flavorful, tender, great aroma, and the skin just falls right off, so peeling is a snap.

I typically go for a three pound octopus when shopping and that’s what I used in the video, and as you’ll see there, after some tinkering, I came up choosing the “fish” preset, and adjusting the time to just a bit over 20 minutes in the PPC XL as an ideal time for that size.

Now, I had intended to do some experiments with different size octopi to give some guidelines for timing, but it has turned out to be a bit complicated. As I said, a three pound octopus is what I normally get here just north of New York City, but that is not so much by choice. I can find good quality specimen here, but my size choices are limited. You see, the smaller Mediterranean octopus is the one that is more sought after back in Italy and it’s these larger 3 pound ones that are exported out to the market here in the US. It’s not worth it for the sellers to send the smaller octopus to the market here where there is less demand. You can find smaller size octopi here, but those are the saline solution injected ones from Philippines I warned about in my videos… avoid those if you can. I do have a source in the Bronx on Arthur Avenue, Randazzo’s Seafood – you can watch our video with them here: https://youtu.be/2sZQ22iO2cI  who caters to the Italian community here in the New York area, and when I make my way down there – unfortunately not as often lately, I will see if I can grab a few of the smaller ones that he manages to have imported here, and then we will give a try. I’m also going to make an educated guess before trying these other sized specimens that the changes in timing will not be much. Since we are dealing with pressure cooking, it’s the amount of pressure that is probably more crucial, as I noticed that all the presets do not suggest any time changes based on the amount. Hopefully we will find out soon enough… and if any of you out there are adventurous enough to try, let us know what you happen to come up with. I think it’s time for some readers to get involved. I want to hear voices from out there. I’ll update this post as more info comes this way.

Keep checking in with the channel and the blog as my experiments with pressure cooking continue. Now of course, you know me… I’m a die hard traditionalist. For affection of my profession and my native southern Italian culture, my first choice is always to cook with authentic methods and means… even if it takes twice as long. But on the other side of the same coin, I know as a chef, you’ve got to deliver quickly sometimes. That’s where I’ve really found this device to be surprisingly useful. I’ve so far had great results (and great time saving) with a variety of dishes; meat stews, pasta fagioli, ossobuco, and more. I even have to admit it’s been a bit of a marriage saver. If you are the one who cooks for your family, I don’t have to tell you about that kind of stress that builds up when dinner was supposed to be ready 30 minutes ago but you’re still chopping ingredients. More on that in future posts.

If you’re interested in purchasing a PPC XL pressure cooker, you can save 10% by using this promo code: POWER16 and purchasing via this link http://pressurecookerdeal15.com 

[Purchases through this link provide commission from Tristar Products to this channel.]

In full disclosure to my fans, the above link is an endorsement for which we receive monetary compensation per purchase. It’s not much, but it is a small way to support the show, and I can vouch that if a product has my endorsement, it’s because we have tried it and I have found it to be a quality product that I can put my name behind. So if you do happen to be considering the purchase of a PPC XL, purchasing through our page would be a great way to show us some love.

I have some other ideas brewing already with this little pressure cooking adventure, and I’d like to hear from any fans out there who have experience with this. A YouTube commenter even asserted that pressure cooking is coming back big time – is this so? Talk to me. Let me know what your opinion is and what you like to cook using this device.

– Chef Tony Scarpati

The Ghosts of Videos Past – Our Roasted Pumpkin Seeds Halloween Special

Hi Everyone,

Jeffrey Chuang here – Producer/Editor of Ask Chef Tony. Yes, I know… it’s been a while since the last post. Guilty as charged… of slacking. It was a challenging summer for both Tony and myself. This blog is important to us and we hope not to lose you as we stumble a bit finding a more consistent posting schedule. I know you are here to hear more from Tony than from me, but Tony will be back on the blogging horse soon to share his insights with you.

We managed to shoot a few new episodes for YouTube, and I’m still editing most of those. Another is about to go up in a day or two so check our channel for that one.

But right now at least we can go down memory lane… this week IS Halloween week and so I thought I would simply repost one of my favorite of our previous episodes – our Halloween Special (Toasted Pumpkin Seeds) from a couple years back… I don’t know why this one never got the large number of hits that I thought it would. We really had a LOT of fun shooting this one, pulling out our best special effects for this one, using a green screen and planning it out so that we could have the final effect of Tony’s talking head on a plate. The hardest part of shooting was reshooting just the head part, and to get Tony’s head to stay very still and have him run the dialogue without waving his hands about as he spoke (which could cause his head to shift around, ruining the effect). Many people would say it’s impossible to get an Italian to talk without exaggerated hand motions, but I managed… so I’m still very proud of this video – plus I thought this was Tony’s best acting performance… do you agree? Let us know. I hope you find this one entertaining, and useful for your leftover pumpkin/squash seeds. I myself loved this recipe so much, I do this every time I get my hands on any squash seeds. Enjoy- and Happy Hallo-weeeeeeeeeeeeeeen!

Jeffrey, Producer/Editor Ask Chef Tony

*update: Ah yes… and as promised, new episode is also up… https://youtu.be/zi-ts-c8kHY

It’s PIZZA TIME! One Million Views and Ten Thousand Subscribers

Well, our YouTube channel recently hit 1,000,000 views, and we passed 10,000 subscribers. THANK YOU VIEWERS! We love you back! To celebrate we pulled out a special episode for everyone… Making Homemade Pizza. Actually, we have wanted to do a pizza episode for quite a while, but it just wasn’t happening.  We had a lot of technical issues such as lost audio, and gaps in our footage, etc, and we ended up filming it several times, and it was shelved for a while before we were finally said “Eff it, let’s make this happen!” and we were able to stitch it all together. So here it is.

Here is a recap for those who are here for the blogged version:

Things you’ll need:

  • A decent oven (one that is well sealed and can reach a true 450 degrees)
  • Pizza screens
  • Pizza peel (the big spatulas you see the pizzeria guys using to move the pizza around) Choose one with a short handle.
  • Spatula for cutting dough and scraping – makes life easier for you
  • Pizza cutter
  • Bowl and Brush

Ingredients:

  • Pizza dough ( here I suggest we keep it simple and you can buy a good quality pre-made dough at a good bakery or supermarket, or just buy raw dough at your favorite pizzeria. You can make your own dough from scratch, but that deserves its own episode and set of instructions, so stay tuned for that one)
  • Crushed tomato ( not flavored or spiced “tomato sauce”… let’s keep it just tomato so that we can control what flavors we want in there.
  • Mozzarella cheese
  • Toppings: here, it all depends on what you want to put on your pizza. In fact, you don’t even have to put cheese, or tomato sauce, if you prefer not (although you would usually have at least one or the other). For instance, you could make a “Marinara” (seafood) pizza, in which you would leave out cheese ( unless you really want cheese and seafood together – I wouldn’t ) or you could make a “white pizza” which leaves out the tomato, for a different taste… all good. Of course, one of the world favorites is the basic “Margherita” pizza which simply has tomato, cheese, and basil. Now besides the usual mushroom, sausage, peppers, and onion, that you will commonly find here at the pizzerias through most of the United States, there is really no reason to restrict yourself to that: I often say you can think of pizza very similarly to pasta dishes: the combinations can be endless. Have some fun. Invent your own. I have a few toppings that you might try either by themselves or in different combinations: leeks, radicchio, prosciutto, arugula,  eggplant (see eggplant prep video here), red onion, broccoli rabe, pine nuts, zucchini, cherry tomatoes, walnuts, exotic cheeses (like gorgonzola). Try one without sauce, a smear of caciocavallo cheese, mustard greens, and truffle oil. Or if going for some seafood, let’s leave out the cheese and try things like shrimp, calamari, mussels out of the shell, or octopus. As you can tell, the list can go on. Just remember that for most of the toppings, it requires a little bit of prep cooking. Most toppings won’t cook thoroughly in the quick time that the pizza is in the oven, so cook your toppings ahead of the pizza making time, and have them out when your pies are ready for your experimenting.
pizza topping variety

Experiment with your toppings!

Get your dough out about a couple hours before you are planning to have your pizzas in the oven. We need to give it about an hour or two to rise – if your kitchen is warm it will rise faster,  if cooler it will take a little longer, but an hour to two hours is probably the norm. Portion your dough with the spatula and start making your dough balls. This part takes a bit of experience to know how big to make your dough balls, but I would say about a tennis ball sized ball will be good for the small 12 inch pizza screens, and something closer to softball size is good for the larger 16 inch pie. The easiest way to make a nice ball is to take the rough edges of the cut dough and sort of wrap them around toward each other till they meet, in an outward and around motion away from you. Try, you’ll get the hang of it. Arrange your dough balls on a baking sheet that you brushed lightly with olive oil to keep them from sticking. Now cut an X at the top of each dough ball, and cover your whole tray of balls with a clean towel moistened with warm water. Now just let it sit. When they rise to about double their original size, it’s pizza making time!

dough balls

Make dough balls, cut an X in the top, and cover with moist towel.

Now… rolling out our pie. On a clean surface, toss a little dry flour (to keep the dough from sticking) and get to work. On TV you will see the pizza guy tossing and flipping the pie to stretch it out. You can try that if you want… takes practice. But it’s totally unnecessary. All the matters is that you get your dough stretched out nice and even and round enough to fit on your screen, but honestly, it doesn’t even have to be round. You can make it any shape, really. More important is to try to keep it even. Be patient and just try to evenly push it out from the center, gradually pushing and stretching. Try to avoid overworking it though. If it gets thin and you get a tear, just overlap the edges of the tear to fix and keep working the rest of it, evening it out as much as possible; avoid the temptation to roll it back into a ball and start over. Don’t judge yourself. Your first two or three pizzas may not look so pretty and even, but will probably taste just great, and it will get much easier with practice.

pie stretching

Stretch it out evenly.

Tony tossing pizza dough

Just for show!

Once you get it stretched out enough, lay it on your screen and start laying on your precooked toppings. Try to keep it simple. If you flood it with crushed tomato for example, your pizza will get soggy. Stay light and get a feel for it. You can get bolder with your experiments as your confidence grows. I always like to start with a basic margherita pizza. The kids love it, and it’s a classic. Always a winner. Margherita is just the basic mozzarella on crushed tomato, and then basil leaves added when it comes out of the oven. Simple, fantastic.

putting pizza in oven

Oven at 450 degrees.

Your oven should be at 450 degrees. Using your pizza peel, slip in your pizza. Start checking after maybe three minutes to see how it’s going. Every oven will cook differently and you need to see how your own oven behaves. When it starts to get a little crispy and I see some evidence of browning on the crust, what I like to do is remove it so that I can brush a layer of olive oil onto the crust. That will help it crisp up with some flavor. Delicious. Then just pop it back in and let that brown for just another minute or two.

brushing olive oil on crust

A touch of olive oil on the crust to make it special!

Your pizza is done when the edges and the underside are browned (take a peek under the pizza screen to check the underside) After you’ve made a couple of these, you’ll know how often to check your oven for doneness.

checking pizza

PIZZA IS READY!

So that’s pretty much it. I guarantee, your family and you are going to have fun with this one. Let us know how your pizza comes out. Let us know what great new pizza recipe toppings you come up with, and keep watching.

Ciao,

Chef Tony Scarpati

My Liver Transplant Checkup: 7 Months Down the Road

dinner in Cleveland

Dinner with friends of the Cleveland Transplant House.

Just got back from a nice trip to Cleveland Ohio. It was a blast to see all my friends that are currently fighting. For the ones of you that don’t know I recently received a liver transplant, and go back periodically for check ups with my magicians, or doctors (Thank You). On this trip it was especially great because it was like being back in my home away from home  – lets remember that it was where my second chance at life began only a handful of months ago. I also got to meet a special guy in person – my now “mentor” for life Mr. Brian Vitale, also a liver recipient but with a heart so big that it could never be transplanted or replaced. We got to hang around in between doctor visits and were able to sneak in some leisure time like visiting the Rock & Roll Hall of Fame Museum.

Brian Vitale and Miriam Bland

Two big hearted people. Brian Vitale and Miriam Bland.

I am now back home with much relief but also few tears in my heart. I already miss you all at the Transplant House of Cleveland. I want all of you here at my house one day so we can all celebrate the gift of new life we all have/are experiencing. I also want to take this moment to thank all of my friends and fans of AskChefTony, my cooking show, and remind you to register to become an organ donor (its easy at the DMV). I will drive you there personally and if you have a chance, dig in YOUR big heart and find a way to help the thousands of people on list waiting for all sorts of organ transplants. My cause will help the Transplant House of Cleveland to accomodate the patients and families around the world that come to Cleveland with tears and hope for a second chance. Anything will help big and small. I will be building an alternative page for the cause and there will be contributions from the great fans I know I have. I will be putting up free dinners, cooking lessons, etc. in exchange for donations. In the mean time, you can start contacting me to get the list going while I build the page. Thank you from the bottom of my heart and liver. America is a great place so lets show it!

– Chef Antonino Scarpati

Tony and Ashley

My friend Ashley. She and others are still waiting for their chance.

My friend Ashley pictured above has been waiting many months (11 and counting) for her chance, and finances are exhausted. If you’d like to help, visit her site www.itsallgoodashley.org

You can also meet her in the video we shot a few months back when Tony had just gotten the green light to return home from Cleveland.

Making a Mascarpone Cheese Substitute for your “Almost Perfect” Tiramisu. – by Bret M. Territo

[Producer Jeffrey Chuang here. Today I’m pleased to introduce a guest post by our viewer and friend Bret M. Territo. In the channel comments, he had some wonderful input on tiramisu, so we’ve invited him to let us in on some of his ideas. Outside of culinary interests, Bret has earned a Master’s Degree in Veterinary Medicine at LSU and has worked as a sheriff’s deputy, firefighter, bomb disposal technician, an EMT, and most recently as a bodyguard for a judge.]

“Where I’m from you have drive north to get to what most people call ‘South Louisiana'” says Bret. Born in a small town on the Gulf Coast of Louisiana, Bret learned to cook at an early age. “South Louisiana is all about food” he says. “It’s a means of survival, a pastime, a hobby, a religion…it’s a language and if you want to communicate you have to be able to cook.”

Bret

My name is Bret M. Territo and I’ve been invited by Chef Tony and his staff to address a common difficulty that many face when attempting to make tiramisu at home. I prepare tiramisu at least once per week, and my hobby is experimenting with different variations of this wonderful creation. Chef Tony once commented to me that tiramisu is “high art” and “incomparable” when done correctly. This is so very true in that one needs the proper ingredients if one wishes to achieve culinary perfection. But on occasion one or more ingredients will be unavailable or of poor quality and substitutions will have to be made-hence the “almost perfect” in the title. Please understand that while substitutions will result in a slightly different end product, it will still be wonderful! Great, but different.

Let’s begin by looking at some tiramisu ingredients that on occasion may be difficult to find. Your first option for any ingredient is to ask your grocery store to order the product for you. If they can’t or won’t, try another one. I suspect that you’ll be pleasantly surprised. Of course this may not be an option in some less developed parts of the world and for those locations I will suggest other options.

One ingredient which may be difficult to find is savoiardi. In the US (and elsewhere) savoiardi is known as “Lady Fingers.” These delicious cookies (biscuits) are similar to a baguette in that they have a firm crunchy outside and a softer chewy interior-perfect for tiramisu! As with everything else, including a spouse, savoiardi can be ordered over the Internet. But you don’t know what you’ll receive and you could end up with a mess of flaky debris. So I recommend against ordering Lady Fingers (or a spouse) through the World Wide Web. Your best option is to make your own. Recipes abound and all ingredients are readily available. Someone even manufactures (or used to) a specific Lady Fingers baking pan. A last option is to simply use an alternate cookie/biscuit. I have found that products made with puff pastry work well. I’ve used Sfogliatine on several occasions with very good results. I’ve seen genoise and various types of sponge cakes used with varying degrees of success. Using cake is really getting away from the whole tiramisu “idea” but if it’s all you have…

People do ask if they can substitute standard coffee for espresso and I tend to discourage the practice. Espresso is really easy to make at home with an inexpensive stovetop espresso maker or you can do what I do: use instant espresso. I personally can not tell the difference between brewed espresso tiramisu or instant espresso tiramisu. The one problem that I personally have experienced is that instant espresso is surprisingly difficult to find in my area!

Selection of alcohol is another common subject area for questions. The following is a list of alcohol types I have personally used: dry Marsala, sweet Marsala, Moscato, ruby port (bad idea), tawney port, white port (the good stuff, not the swill sold at the corner stop-and-rob), brut Champagne, sec Champagne, brut sparkling wine, Proseco, cognac, brandy, dark rum, kirschwasser, Maraschino liqueur, Cointreau, Grand Marnier, Zabaglione liqueur, Godiva chocolate liqueur, Godiva white chocolate liqueur, calvados, coffee liqueur, amaretto, Disaronno, Nocello, Navan (very good but they quit importing it into my home state!), Pernod, and Sambuca. I’ve heard of someone using bourbon but don’t know if it works. I want to try Pastis.

[Producer’s note: Or if for whatever reason, you want to leave any alcohol out, then by all means.]

Now, I saved the biggest problem for last-Mascarpone cheese. This used to be rare but is now in virtually every supermarket I frequent. Nonetheless many aspiring pastry chefs have to make due with something else. I used to recommend not substituting and prepare something else but realized that the end result will be good even though it’s “imperfect tiramisu.” In much of the world your grocer can order this for you. You can also order this on the Internet but with exorbitant shipping costs.

Another little explored option: make it yourself. I fully intend to begin making my own ricotta and Mascarpone before the end of this year. It’s simple to make as cheese goes-no special equipment is needed and there is no strict temperature control or long aging times in the process. It can be “set” with a simple acid byproduct of winemaking or you can go for a higher quality product and purchase starter cultures. Mascarpone is an incredibly versatile cheese and can be served with fruit, spread on bakery products, and used to make sauces. So it is worthwhile to make it even in relatively rural, undeveloped areas.

When all other options are exhausted, you’re going to have to mix a substitute. Before I continue with the recipe I want to suggest that you do everything possible short of a felony to get some real Mascarpone cheese. You really should know what it’s supposed to taste like before you start trying to “fine-tune” a replacement.

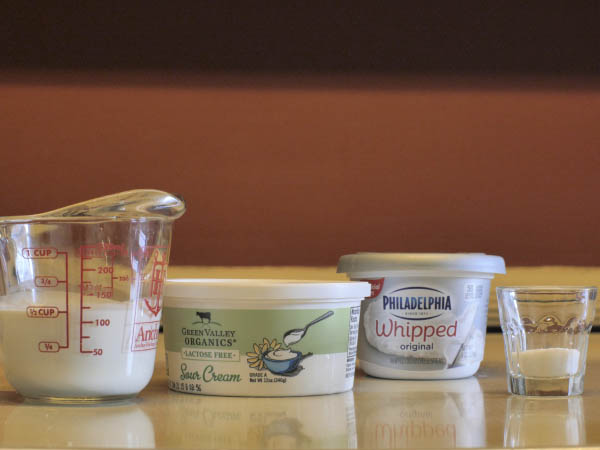
Once you know what Mascarpone looks, feels, smells, and tastes like you’re ready to counterfeit a batch. To replace 500 grams Mascarpone (this is for one “standard” tiramisu recipe using 5-6 egg yolks) you’ll need 450 grams (1 lb.) cream cheese. In the US it will probably be one brand regardless of where you live. I’ve even seen it in a store in the Canadian sub-arctic.

[Producer’s note: Bret suggests using ‘whipped’ cream cheese to get the smoothest texture possible. Regular cream cheese will work too, but it’s much harder to get the lumps out. In the demo photos you see here, I used half whipped, half regular. I like the density of the regular, so I split the difference.]

As with Mascarpone you want it at room temperature to work with…it’s impossible to work with brick-hard cheese regardless of type. You don’t want dairy products at room temperature any longer than necessary nor do you want to repeatedly warm-chill-warm-chill cycle. Leave everything in its original packaging while you’re warming it to room temp. Also, have everything else ready before you start this step: Have your yolks/sugar/alcohol mixture cooked to ribbon stage and cooled to room temperature. Prepare your espresso/sugar/vanilla/alcohol solution and have the first layer of Savoiardi wetted and in the bottom of the pan. Have the cream or egg whites and sugar whipped and in the refrigerator.

_1180294

You will also need 125 ml. (1/2 cup) heavy cream or heavy whipping cream of about 36% milk fat. You will need about 80 grams (a tiny bit more than 1/3 cup…closer to 5 tablespoons) of sour cream TO START. Make sure you stir the sour cream thoroughly before you remove it from its original container for weighing/measuring. Sour cream that’s been sitting in a cold case will often separate over time and you might notice a thin layer of liquid on the surface of the sour cream when you open it after it’s been warmed. Again, stir to recombine before using it. Last you might require some very fine sea salt.

Using a stainless bowl and spatula thoroughly combine the cream and sour cream.

_1180296

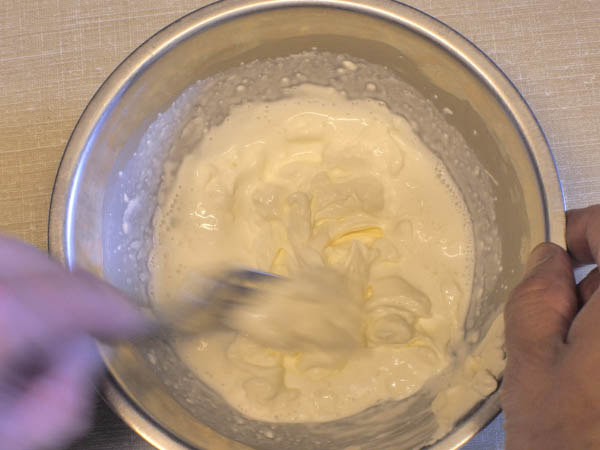
mixing sour cream and heavy cream


Start incorporating the cream cheese a little at a time…NOT all at once. Thoroughly incorporate one piece before adding more or you’ll end up with a lumpy mess. Once you’ve finished force the mixture through a medium mesh strainer. Regardless of how careful you were there will probably be a few lumps of unincorporated cheese especially if it’s too cold.

_1180311

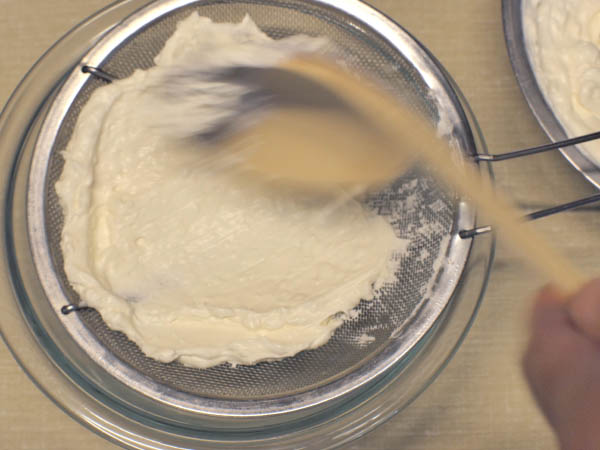
forcing mixture through strainer to remove large lumps


When you are done taste your handiwork. Even though all the cream cheese will be pretty much the same the sour cream will probably be a product of a local dairy. The “tartness” will vary and you might find it necessary to add a little more sour cream to the mix. You may also need to add a little salt but it’s unlikely.

_1180319

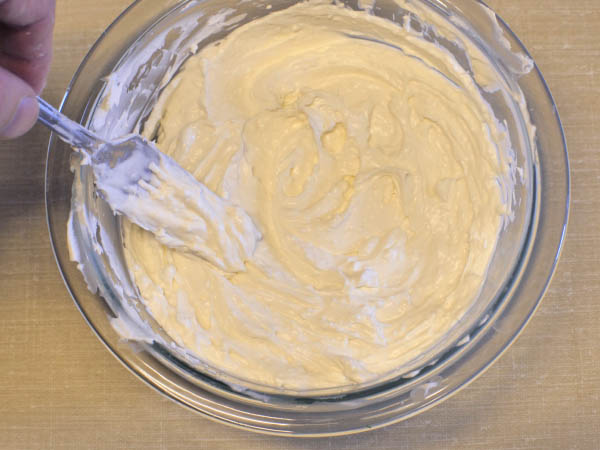
finished “faux” mascarpone, ready to use


Now that you have a suitable “faux” mascarpone, you can go ahead with the rest of the tiramisu recipe. The video instructions as per Chef Tony can be found right here. and the blog recap of the recipe is right here. Happy Eating!

Bret M. Territo

Sent from my iPhone

Happy Easter to Everybody!

April 5, 2015

IMG_6586

The beautiful smell of spring in the air, mixing with the intense aroma of three hard days of crafting and creating in the kitchen; pleasurably torturing our eyes, noses, mouths and ears. Knowing we cannot savor anything in front of us until every last guest has arrived… and don’t forget, church first!
Enjoy your Easter everyone!

Chef Tony Scarpati


Our Best “Undiscovered” Ask Chef Tony Videos – My Top 5 List

Posted by Jeffrey Chuang (Producer of Ask Chef Tony)
Hey, let’s talk about YouTube. My daughter just turned 12 last week. Back when I was 12, my friends and I used to imagine what today might look like. Most of our ideas about “the future” looked similar to Start Trek ( RIP Leonard Nimoy ) and The Jetsons  – talking computers, personal spacecraft, teleportation, robots, and video phone calls. I had enough creativity to go somewhat beyond that, but still, looking around now, my vision was shortsighted and the results are very hit and miss – and more miss than hit. A lot of what we predicted actually came true, in some form or another, but often not in the way we visualized. Most of the gadgets used in Star Trek could probably be replaced with an iPhone and some clever apps. But more importantly, the overall feeling, the “zeitgeist” of 2015 is very different from the 2015 I thought it would be. I guess I imagined it would be just like the 70’s but with cooler gadgets with a lot of blinking lights, a robot friend… and shiny metallic clothes.

film still from “Voyage to the Planet of Prehistoric Women”

Film still from “Voyage to the Planet of Prehistoric Women”

And though teleporting would still be cool, the one huge thing that we did not see coming (and what makes 2015’s truth much stranger than fiction) is the totally game changing effect of the www – taking billions of individuals and plugging them in together – a model that has turned the world on its head, and changed our social lives, our business models, our media, and more. A virtual explosion which has resulted in data sharing, networked computing, googling, yelp, social media, wikipedia, wiki this, wiki that, crowdfunding, crowdsourcing, crowd everything…  and OF COURSE, YouTube, where one day I decided to create a cooking show.

It occurred to me that aside from the cooking, maybe some readers want to know how our YouTube channel is produced, so why not share some of my thoughts on this, perhaps even make it a regular topic here… maybe some of you out there are YouTube creators, or have thought about it. After a camping trip in 2011, Antonino Scarpati and I came up with the idea of Ask Chef Tony, and our first episode was about as simple as possible. I pointed the camera at Tony and he talked about olive oil. Upload. Episode 1. Done. Each new show, we stretched ourselves a little more. Now it’s April of 2015, and here I am helping to craft yet another year of Ask Chef Tony episodes. By contrast, my past has been embarrassingly full of abandoned projects and ideas that never got past my sketchbook, so it’s to my own surprise to find myself here with over 50 carefully crafted shows up on the Ask Chef Tony channel. Something must be working for me. Thank you YouTube.
A lot of factors determine how many views a video will get and how long it will continue to get new views. It’s a continual education for me as I watch some episodes that I expect to do well quickly stall out and plateau, and others that seem to have little promise will unexpectedly take off. I glean some new knowledge each time. I’d love to share in detail all I’ve learned, in future posts, but today what I’d like to do is highlight the few episodes that are personal favorites of mine, but have not gotten their due number of views from the public, mostly because they do not fall into popularly searched categories. We sometimes do episodes that we know may not get a lot of views, but we do them anyway, striving for an authentic representation of the cuisine, rather than just chasing numbers. Still, we hope curious and adventurous viewers may stumble on some of our lesser known gems.
All our episodes are like dear children to me… I’m proud of all of them, but yes, I have my favorites. None of them are total embarrassments (those are buried in the backyard), but, you know, some just turned out better than others. The ones on my list today are kind of like what I consider my quiet, shy, special ones. Yes, we have our big jock popular ones like our Tiramisu episode, or the Octopus, or Kale – but hey, what about little Junior there? Did you meet Pesce Marinato, or Pizza di Macaroni? Oh, he’s charming – maybe you never noticed him sitting in the corner there, but you really should get to know him.
So with no further ado, here is my list:

5.Broccoli Rabe – This episode has actually been taking flight lately, or at least showing signs of life. The public seems to be finding ways to stumble on our video about this awesome vegetable… so hopefully next time it will be too popular to make this list.


4.Pasta with Potato, Peas, and Ham – This is a perfect episode for anyone trying to make dinner in a hurry. It’s just what you need to know, delivered in a no nonsense style. Plus, kids love it. It’s probably not highly viewed because it’s so basic, and not a famous celebrity like “Bolognese” or “Carbonara”.


3.Pasta Pizza – This is a great recipe for leftover pastas. I don’t know why this has been so hard for people to find. It’s still a bit of a mystery to me why this one does not get bigger numbers. The sound quality was a little off, but other than that, it’s an episode that I feel was shot well and delivers a great useful recipe.


2.Roasted Lemon Chicken (Pollo al Limone) – This one also, I feel should be getting more views, and have not figured out why it is not getting found. It’s funny, and useful. Plus nephew Daniel gives an entertaining acting debut at the end. (And even if you think he stunk, it’s still a great recipe)


1.Pesce Marinato  (Fish and Seafood cooked in Vinegar) – This one I included because it’s a favorite of Tony’s. You can see and feel his enthusiasm for this dish. I feel it’s one of the most solid episodes, technically. It’s also just a very unique recipe. It does not get high numbers because it’s just not a dish people are aware of, so they are not searching for it. You just sort of have to stumble on it. And you know what else? It’s friggin delicious!


So that is my list of critically acclaimed “box office flops” (me being the critic). Let me know if you’d like to see more posts about youtubing and producing a cooking channel. And also please subscribe to both our site here, and our youtube channel if you want to stay updated with us. Ciao!

Jeffrey, Producer of Ask Chef Tony


Somewhere Beyond the Sea… (Guest post by Francesca)

Today’s post written by our friend Francesca, host of our most recent Ask Chef Tony episode “Spaghetti alle Vongole” as she vacations in the Dominican Republic, taking some time by the beach to reflect on her childhood in Italy.


Spaghetti con le Vongole.

Like many family traditions of Italy, this dish has been a part of our lives since the Roman Empire.
Originating from Naples, there are two basic versions – there is “dirty” (with a touch of tomato) and there is the classic and poorest style, with garlic, olive oil, red pepper and lots of parsley, otherwise known as “white sauce”.
In our homes from north to south, we used to prepare this dish for the Christmas Eve dinner in keeping with the history of the Roman Empire. I myself come from Rome, where, by good fortune, the tradition is doubled up! On Easter Day as well, the entire town goes out to celebrate the holiday with a lunch at a beach town. Whoever you are, you will always look to go to the best place to have fish. It’s like an absolute must – it’s the opening of the summer palate! Where we grow up, we insist the fresh fish has to be eaten right after the fishermen come back, and so we always choose a beach town restaurant. I remember, as if it were yesterday, all the kids laughing, screaming, playing, and running around the family table. And when the food was ready you would find me sitting in front of my Spaghetti Alle Vongole, my spaghetti with clams, which mom used to cut in small pieces and help me to eat. I would turn my meal into a careful artwork by adding with my little fingers exactly one clam on the fork tines for each precious bite.
As I got older many things have changed, but not the tradition. I still do the Easter lunch with friends every year, and now I enjoy my dish with those close to me, just as I did back then, but with a variation – the same menu; Spaghetti with Vongole, Rombo con Patate (a fish with potato dish) but now I can complete the Easter with a nice Falanghina wine!
Thinking and writing about it make me smile – it is something really hard to completely describe. Memories are so unique. Different regions of Italy maybe have different traditional foods for Easter, but for me, as a Roman, I will always have my Vongole. It brings me home and I can smell the beach!
Well, I think it’s time to get up and let you go because I just got hungry. I need some Vongole!😄

Ciao,
Francesca

Sent from my iPad

Ingredients to serve four:

  • About 4oo grams of Spaghetti
  • 1 bunch parsley
  • 3 cloves garlic
  • About 50 to 60 fresh live clams (12 to 15 per person)
  • White wine
  • Peperoncino (chili pepper flakes)
  • Olive oil
  • Salt

Wash your clams a few hours ahead by submerging them in a large basin or pot of fresh cold water. Add about a tablespoon of salt per quart of water and let it sit for 4 to 6 hours, stirring the clams around a few times. The clams will release whatever sand and grit they contain and you can now remove them from the water.

To start your dish, use a lidded saucepan large enough to contain all your clams. Before steaming your clams, put enough olive oil to generously cover the bottom of your saucepan and over low heat, add two whole garlic cloves, one diced garlic clove, half a bunch of finely chopped parsley, and chili pepper flakes to taste. Be careful not to let anything burn. The goal is to work the flavors into the olive oil and two to three minutes should be enough.

Now add your clams to the saucepan and bring the heat up to medium, and cover. The heat should soon dispatch your clams and they will quickly open up, and release water and juice, creating your sauce. This can take from 5 to 10 minutes, and hopefully not much more. You don’t want to leave the clams in too long or they will overcook and become tough. Stir the clams on occasion to make sure they heat evenly. While your clams are steaming, you can get a pot of water started for your pasta. Once you see all or most of the clams are open, give it another minute and then shut the heat. If there are clams that simply refuse to open, they may have been dead clams to start and you should discard them. An additional step to take to make the dish a bit more practical, is to remove some of the shells ahead of time (about half) so that the diner does not have to spend the evening removing every clam from its shell. You want to leave a few, for some aesthetic and tactile appeal, but go ahead and do some of that labor ahead of time.

Once your pot of water is boiling, add a small handful of salt, and your pasta (about 100 grams per person). Check the package for the timing. You’ll want to take your pasta out just a bit before it’s done. Set your timer. While that’s going, bring your flame back up high on your pot of clams. When that starts to bubble, flash it with a couple dashes of white wine. Give that a minute or two to burn the alcohol off and then shut the flame. When your pasta is nearly done, take it off and drain. Now marry it with your clams (if your saucepan is not large enough, you can use the pasta pot) Put some heat under it, and mix it all together. The clams will have released a lot of liquid, so this extra mixing time will let the pasta absorb some of that liquid and finish cooking itself.

And that’s it. You’re dish is done. Just plate it, and enjoy it with a nice white wine.